Next.js로 jQuery 포트폴리오 업그레이드하기 - 컴포넌트화 편

2020년 취업 초반에 만들었던 jQuery 포트폴리오를 Next.js로 업그레이드하면서 적는 Next.js 고군분투기
https://aainterior.com.ua/를 클론코딩한 사이트 입니다.
🍽️ 기존 프로젝트에서의 컴포넌트
기존 프로젝트에서는 컴포넌트라는 개념이 없었습니다. 그냥 생 html.....
그래서 어쩌면 공통된 ui나 부분들도 노가다로 작성했던 기억이 나요.
디자인 적인 요소가 많은 프로젝트이다보니, 공통적으로 컴포넌트화 할 것들이 많진 않지만
오히려 잘 됐다고 생각했습니다. 작은 규모부터 컴포넌트화를 시켜보면 연습이 될 테니까요.
🍽️ 컴포넌트화가 필요하다고 생각한 이유
my works나 javascript, css 작업물들을 나열한 부분들을 보면, 내용이 추가될 때마다 html을 추가해줘야하는 번거로움이 있겠다 생각했습니다.
html+css 템플릿을 컴포넌트화 하고, 관련 내용들은 json으로 관리하는게 적절하다고 판단했습니다.
🍽️ 기존 프로젝트 코드 분석 - 컴포넌트화 할 수 있는 부분을 찾아보자!
Section별로 컴포넌트 나누기
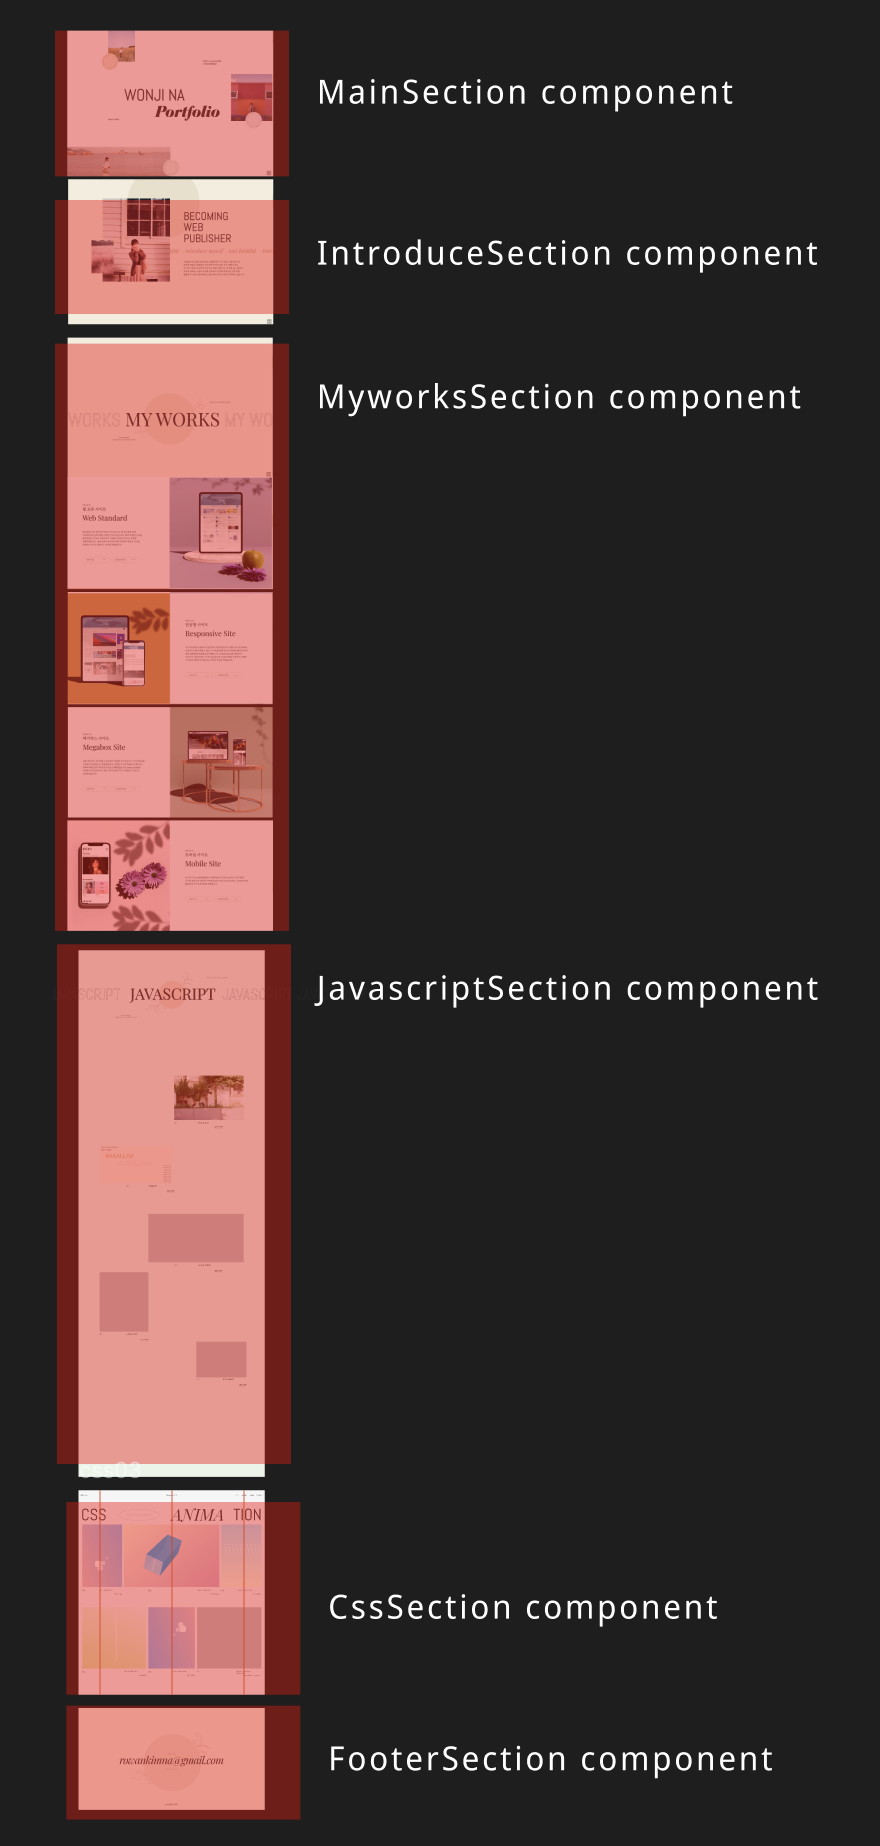
섹션 제목부분
공통적으로 디자인이 동일하고, 다른 것은 텍스트와 컬러밖에 없기 때문에 컴포넌트화에 용이하다고 생각했습니다.
my works의 사이트 소개부분
좌우로 이미지 위치가 달라지는 변경점이 있지만, props로 값을 보내 css를 변경시키면 되겠다고 판단했어요.
컴포넌트를 구성하는 데이터들은 mdx나 json으로 만들어야겠다고 생각했습니다.
javascript, css > import한 부분 각각
 공통적으로 디자인 템플릿이 동일하여 한 컴포넌트로 만들고 props로 상세한 css 설정과 데이터를 넣어주어야겠다고 생각했습니다.
🍽️ Next.js 컴포넌트 파일 구조 설계
/app
├── layout.tsx
├── page.tsx
├── components/ # ✅ 컴포넌트 모음 폴더
│ ├── ui/       # ✅ (1) UI 공통 컴포넌트
│ │ ├── Button/ # ✅ Button 컴포넌트 폴더
│ │ │ ├── Button.tsx
│ │ │ └── Button.module.css
│ │ └── index.ts # UI 컴포넌트들을 한 번에 export
│ │
│ ├── layout/   # ✅ (2) 레이아웃 관련 컴포넌트
│ │ ├── Header/ # ✅ Header 컴포넌트 폴더
│ │ │ ├── Header.tsx
│ │ │ └── Header.module.css
│ │ ├── Footer/ # ✅ Header 컴포넌트 폴더
│ │ │ ├── Footer.tsx
│ │ │ └── Footer.module.css
│ │ └── index.ts
│ │
│ ├── sections/ # ✅ (3) 특정 페이지에 포함되는 섹션 컴포넌트
│ │ ├── Main/   # ✅ Main 컴포넌트 폴더
│ │ │ ├── Main.tsx
│ │ │ └── Main.module.css
│ │ ├── Info/   # ✅ Info 컴포넌트 폴더
│ │ │ ├── Info.tsx
│ │ └─└── Info.module.css
│ └── index.ts # 모든 컴포넌트들을 한 번에 export
│
├── styles/ # 전역 스타일
├── public/ # 정적 파일 (이미지, 폰트 등)
└── ...
컴포넌트들은 components 파일 하위에 존재할 수 있도록 지정했습니다.
작은 ui단위의 공통컴포넌트는 app/components/ui폴더로,
레이아웃단위의 공통컴포넌트는 app/components/layout폴더로,
큰 섹션단위의 공통컴포넌트는 app/components/section폴더로 지정했습니다.
🍽️ 컴포넌트 변환 과정
섹션 container 레이아웃 SectionContainer 만들어주기
<section id="section2">
  <div class="row">
    <div class="container">
      <div class="sec2">. .여기서부터 콘텐츠 시작! . .</div>
    </div>
  </div>
</section>
공통적으로 myworks, javascript, css 섹션부분의 html에 레이아웃을 잡기 위한 container가 설정되어 있었습니다.
이는 header와 footer단위의 큰 레이아웃은 아니지만, section안에 사용되는 공통된 레이아웃이라서, 레이아웃 폴더에 반영해주었어요.
row는 양 옆에 패딩이 설정되어 있는 클래스였는데, container와 역할을 다르게 할 필요가 없어서 container안에 병합해 주었습니다.
다음은 공통 container를 적용한 SectionContainer컴포넌트 입니다.
import { ReactNode } from "react";
import styles from "./SectionContainer.module.css";
export default function Container({
  children,
  sectionId,
}: {
  children: ReactNode;
  sectionId: string;
}) {
  return (
    <>
      <section id={sectionId} className={styles[sectionId]}>
        <div className={styles.container}>{children}</div>
      </section>
    </>
  );
}
import SectionContainer from "@/app/components/layout/SectionContainer/SectionContainer";

export default function IntroduceSection() {
  return (
    <>
      <SectionContainer sectionId={"section2"}>
        <div className="sec2">. . . 내용 시작!</div>
      </SectionContainer>
    </>
  );
}
SectionContainer 컴포넌트를 적용하였습니다.
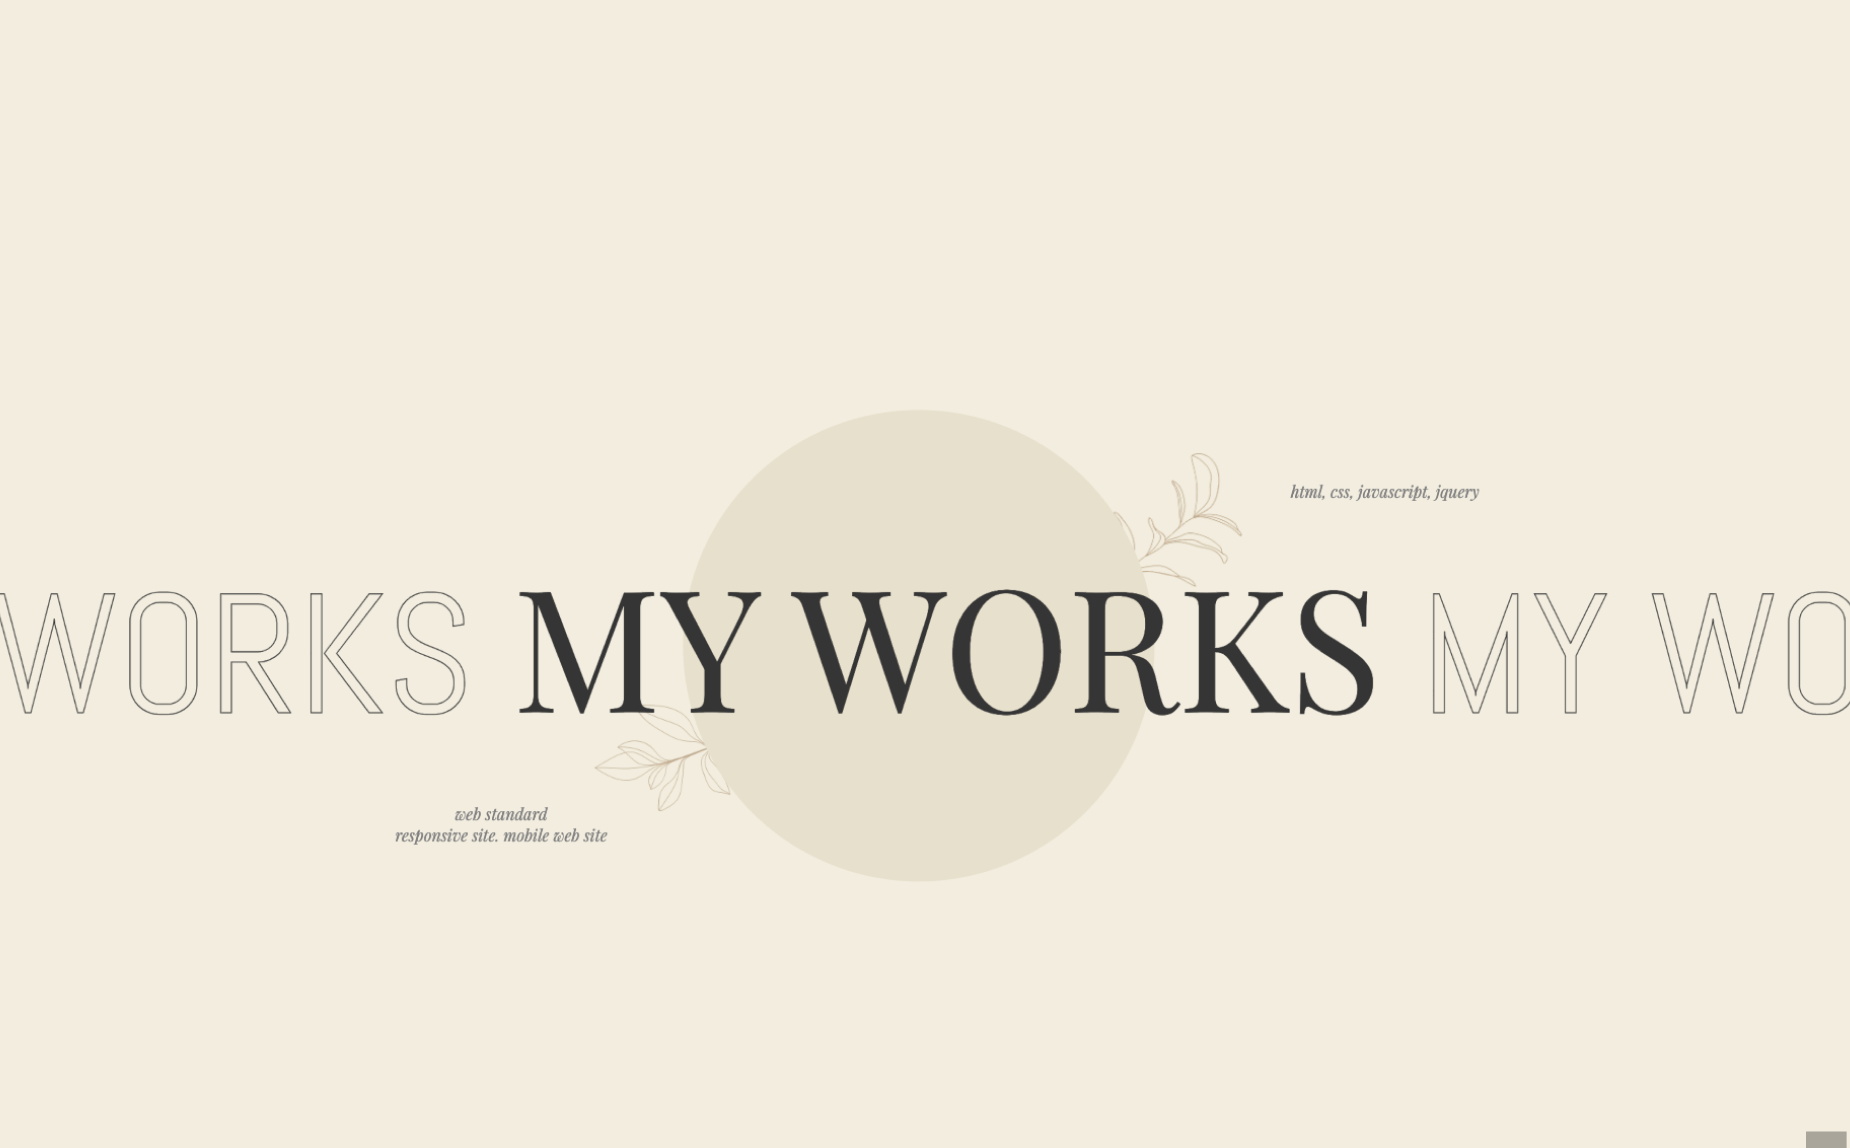
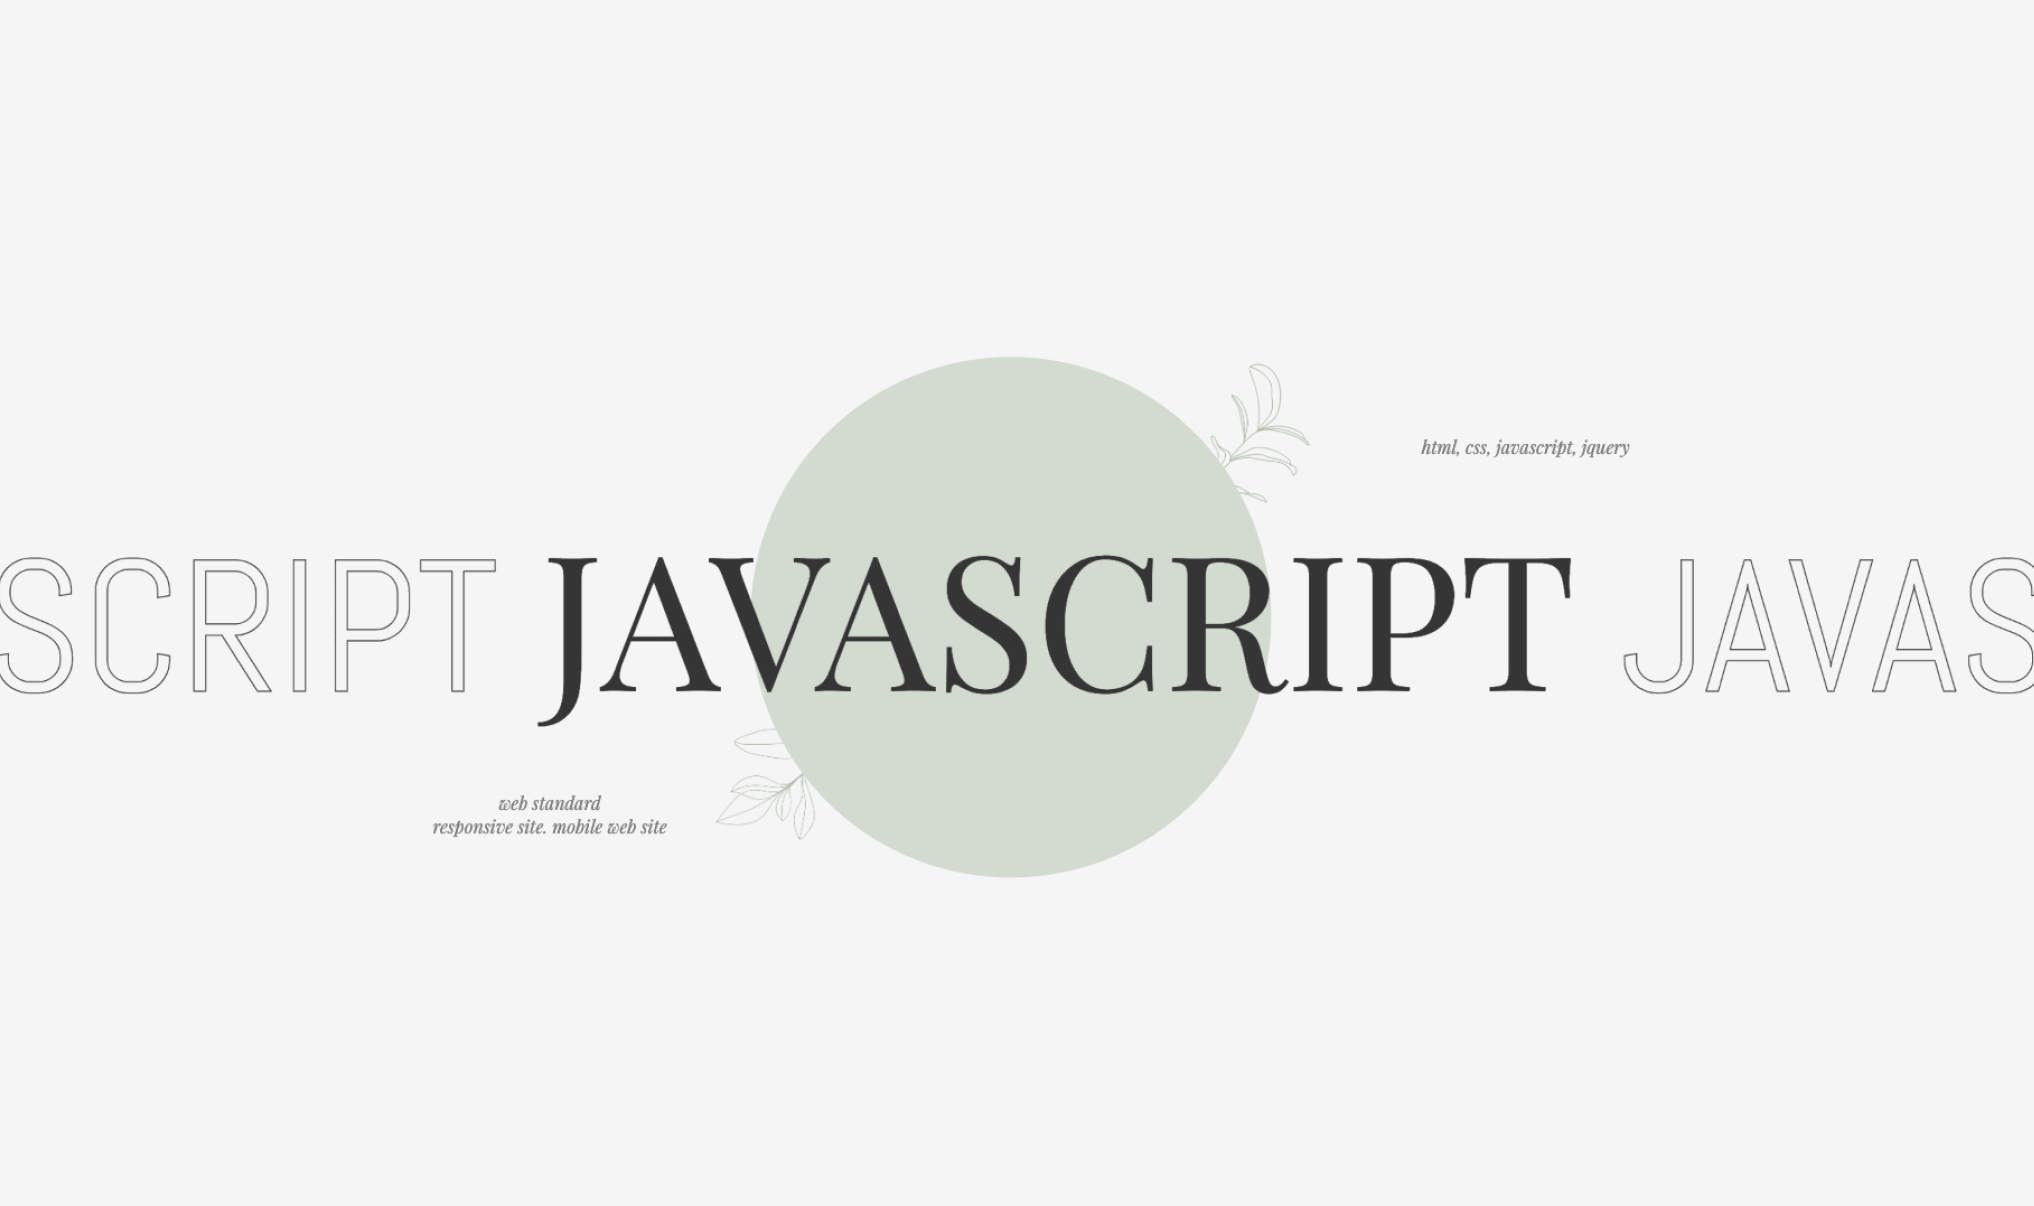
TitleSection 만들기

공통된 디자인에 제목만 달라서 컴포넌트화 해주었는데요, TitleSection.tsx은 다음과 같습니다.
import SectionContainer from "@/app/components/layout/SectionContainer/SectionContainer";
import styles from "./TitleSection.module.css";

import Image from "next/image";
import LeftImg from "@/public/img/leaf_left.png";
import RightImg from "@/public/img/leaf_right.png";

export default function TitleSection({
  titleSectionId,
  titleSectionClass,
  title,
}: {
  titleSectionId: string;
  titleSectionClass: string;
  title: string;
}) {
  return (
    <>
      <SectionContainer sectionId={titleSectionId}>
        <div className={styles[titleSectionClass]}>
          <h2 className={styles.sec3_h2}>
            {title} <strong className={styles.sec3_h2_strong}>{title}</strong>{" "}
            {title}
          </h2>
          <span className={`${styles.sec3_span} ${styles.sec3_left_text}`}>
            <span className={styles.sec3_left_text_span}>web standard</span>
            responsive site. mobile web site
          </span>
          <span className={`${styles.sec3_span} ${styles.sec3_right_text}`}>
            html, css, javascript, jquery
          </span>
          <div className={styles.tit_bgcircle} aria-hidden="true"></div>
          <Image
            aria-hidden="true"
            className={styles.rightLeaf}
            src={RightImg}
            alt="rightLeaf"
          />
          <Image
            aria-hidden="true"
            className={styles.leftLeaf}
            src={LeftImg}
            alt="leftLeaf"
          />
        </div>
      </SectionContainer>
    </>
  );
}
적용본은 다음과 같습니다.
"use client";
import TitleSection from "@/app/components/sections/TitleSection/TitleSection";

export default function MyWorksSection() {
  return (
    <>
      <TitleSection
        titleSectionId={"section3"}
        titleSectionClass={"sec3"}
        title="my works"
      ></TitleSection>
  )
}
MyworksSection, javascriptSection, cssSection json으로 데이터 만들기
MyworksSection, javascriptSection, cssSection은 확장성을 고려하여 데이터�들을 json으로 만들고 map을 돌려서 뿌려줘야겠다고 생각했습니다.
json 파일은 src/public에 json 폴더를 만들어 위치시켜 준 뒤 다음과 같이 적용해 주었습니다.
import SectionContainer from "@/app/components/layout/SectionContainer/SectionContainer";
import TitleSection from "@/app/components/sections/TitleSection/TitleSection";
import styles from "./MyWorksSection.module.css";
import { works } from "@/public/json/myWorksData.json";

export default function MyWorksSection() {
  return (
    <>
      <TitleSection
        titleSectionId={"section3"}
        titleSectionClass={"sec3"}
        title="my works"
      ></TitleSection>

      <SectionContainer sectionId={"section4"}>
        {works.map(
          ({
            id,
            subTitle,
            title,
            backgroundURL,
            desc,
            siteLink,
            descLink,
          }) => (
            <div key={id} className={`${styles.my}`}>
              <div
                style={{
                  background: `url(${backgroundURL}) no-repeat center/cover`,
                }}
                className={styles.works_img}
                aria-label={desc}
              ></div>
              <div className={styles.works_desc_wrap_show}>
                <div className={styles.works_desc_wrap_works_desc}>
                  <span className={styles.works_desc_wrap_works}>
                    project {id < 10 ? `0${id}` : id}
                  </span>
                  <h3 className={styles.works_desc_wrap_works_desc_h3_show}>
                    {subTitle}
                    <strong
                      className={styles.works_desc_wrap_works_desc_h3_strong}
                    >
                      {title}
                    </strong>
                  </h3>
                  <p className={styles.works_desc_wrap_works_desc_p_show}>
                    {desc}
                  </p>
                  <div>
                    <a
                      className={styles.works_desc_wrap_works_desc_works_btn_a}
                      href={siteLink}
                      target="_blank"
                    >
                      <strong
                        className={
                          styles.works_desc_wrap_works_desc_works_btn_a_strong
                        }
                      >
                        view site
                      </strong>
                      <span
                        className={
                          styles.works_desc_wrap_works_desc_works_btn_a_arrow
                        }
                        aria-hidden="true"
                      ></span>
                    </a>
                    <a
                      className={styles.works_desc_wrap_works_desc_works_btn_a}
                      href={descLink}
                      target="_blank"
                    >
                      <strong
                        className={
                          styles.works_desc_wrap_works_desc_works_btn_a_strong
                        }
                      >
                        description
                      </strong>
                      <span
                        className={
                          styles.works_desc_wrap_works_desc_works_btn_a_arrow
                        }
                        aria-hidden="true"
                      ></span>
                    </a>
                  </div>
                </div>
              </div>
            </div>
          )
        )}
      </SectionContainer>
    </>
  );
}
json 데이터는 다음과 같습니다.
{
"works": [
{
"id": 1,
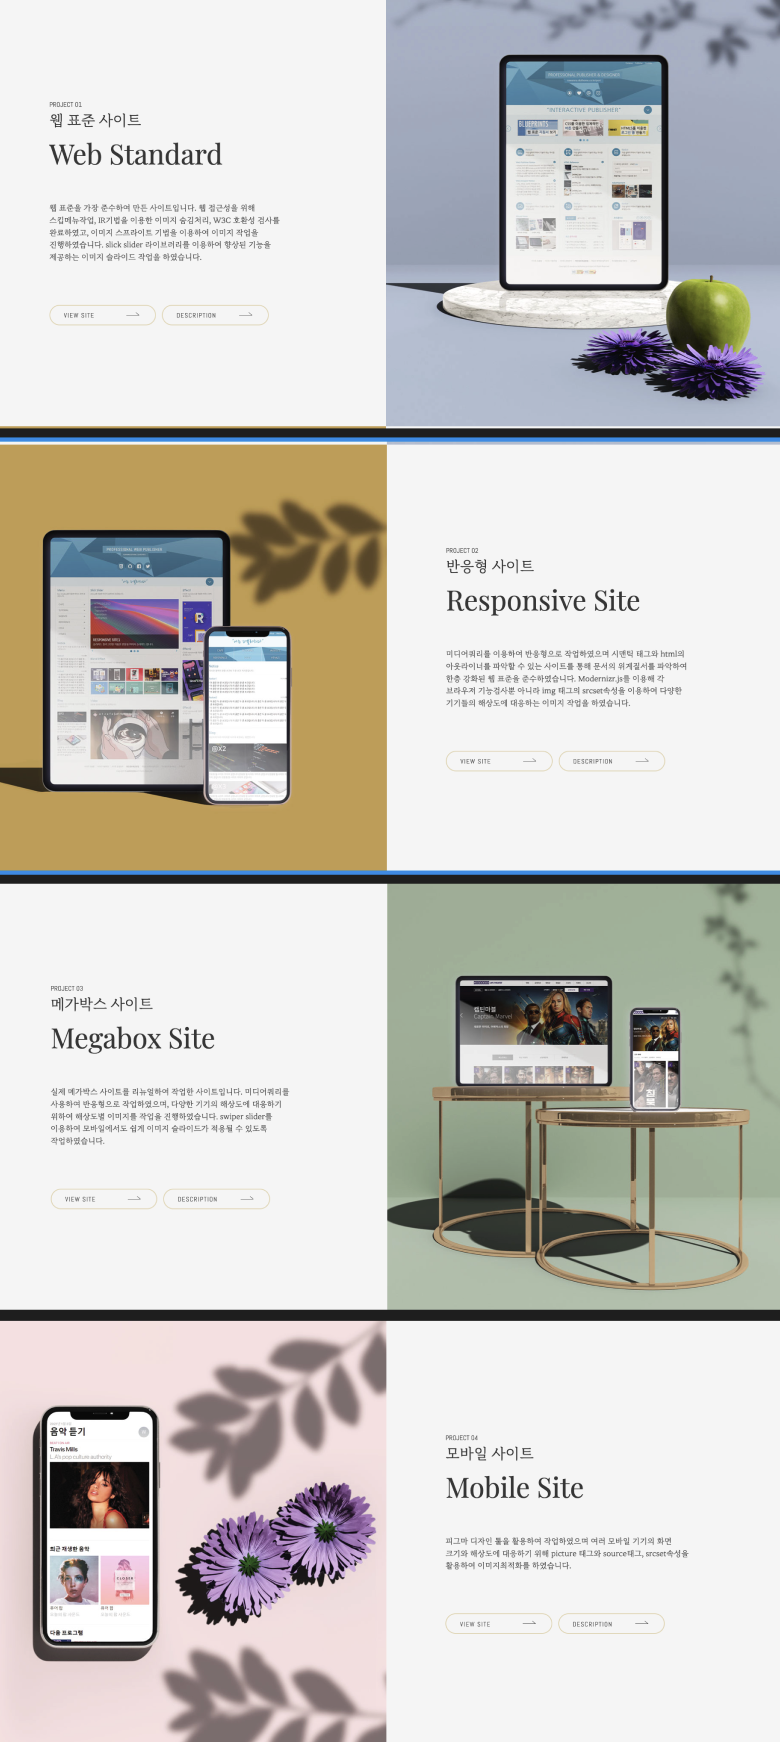
"subTitle": "웹 표준 사이트",
"title": "Web Standard",
"backgroundURL": "/myworks01.jpg",
"desc": "웹 표준을 가장 준수하여 만든 사이트입니다. 웹 접근성을 위해 스킵메뉴작업, IR기법을 이용한 이미지 숨김처리, W3C 호환성 검사를 완료하였고, 이미지 스프라이트 기법을 이용하여 이미지 작업을 진행하였습니다. slick slider 라이브러리를 이용하여 향상된 기능을 제공하는 이미지 슬라이드 작업을 하였습니다.",
"siteLink": "",
"descLink": "https://www.notion.so/Web-standard-39d3df460a42439f84a01e86f8e8b6e1"
},
{
"id": 2,
"subTitle": "반응형 사이트",
"title": "Responsive Site",
"backgroundURL": "/myworks02.jpg",
"desc": "미디어쿼리를 이용하여 반응형으로 작업하였으며 시맨틱 태그와 html의 아웃라이너를 파악할 수 있는 사이��트를 통해 문서의 위계질서를 파악하여 한층 강화된 웹 표준을 준수하였습니다. Modernizr.js를 이용해 각 브라우저 기능검사뿐 아니라 img 태그의 srcset속성을 이용하여 다양한 기기들의 해상도에 대응하는 이미지 작업을 하였습니다.",
"siteLink": "",
"descLink": "https://www.notion.so/Responsive-site-4774617110ad48949a1791a785f2de1d"
},
{
"id": 3,
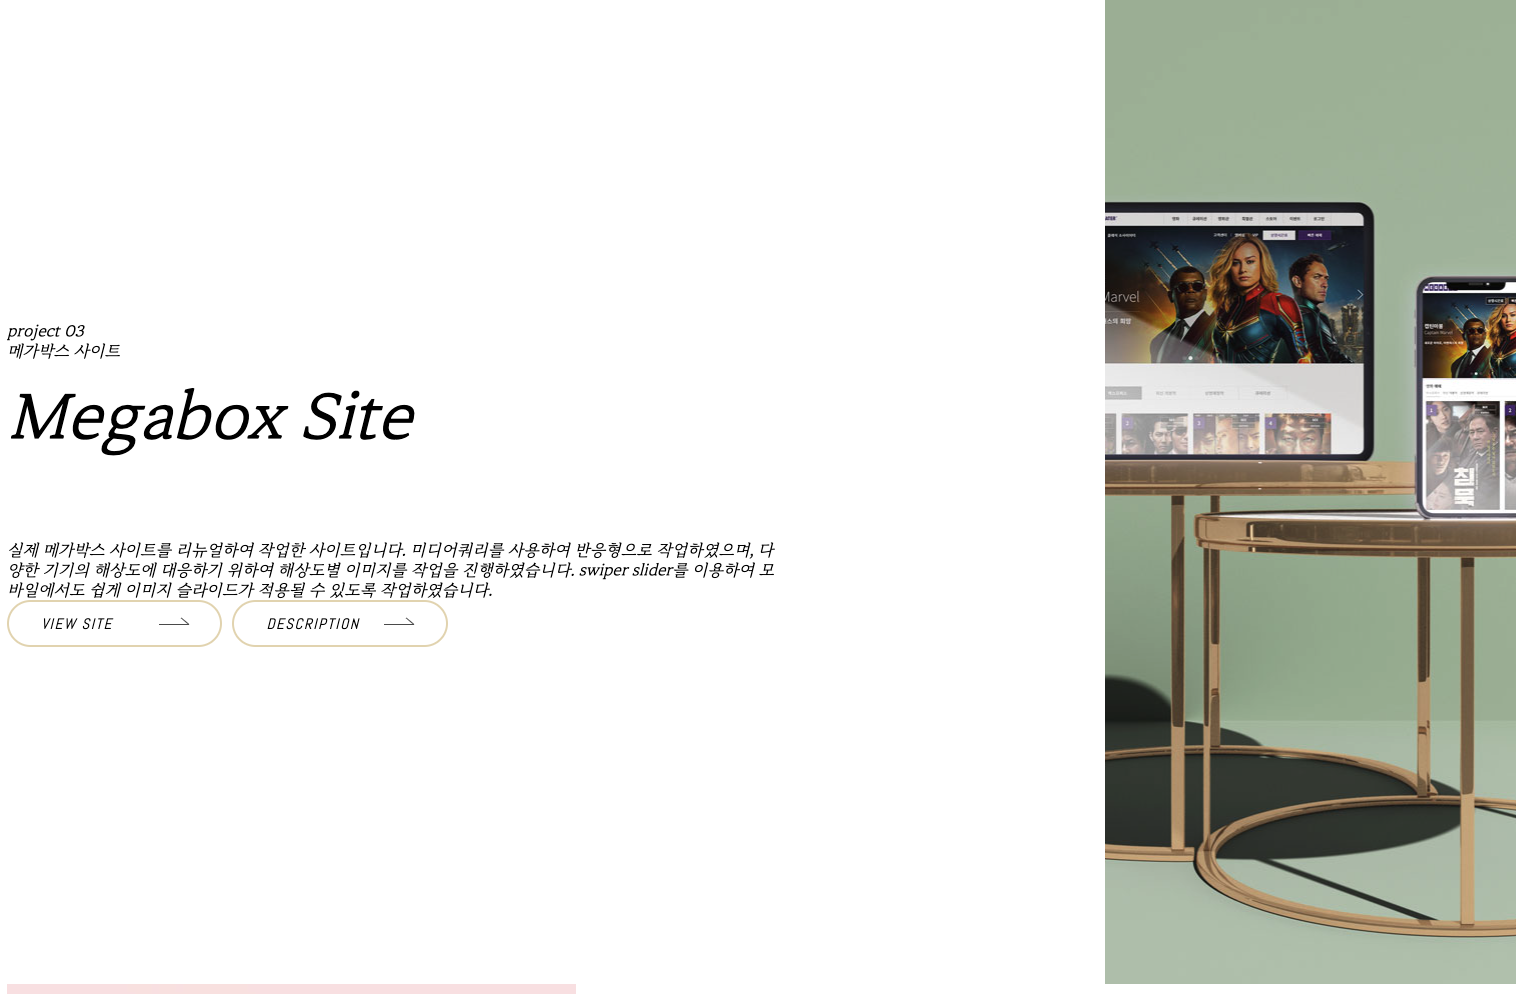
"subTitle": "메가박스 사이트",
"title": "Megabox Site",
"backgroundURL": "/myworks03.jpg",
"desc": "실제 메가박스 사이트를 리뉴얼하여 작업한 사이트입니다. 미디어쿼리를 사용하여 반응형으로 작업하였으며, 다양한 기기의 해상도에 대응하기 위하여 해상도별 이미지를 작업을 진행하였습니다. swiper slider를 이용��하여 모바일에서도 쉽게 이미지 슬라이드가 적용될 수 있도록 작업하였습니다.",
"siteLink": "",
"descLink": "https://www.notion.so/Megabox-site-a3e68dc6928d47d4a234c77b8c23a6da"
},
{
"id": 4,
"subTitle": "모바일 사이트",
"title": "Mobile Site",
"backgroundURL": "/myworks04.jpg",
"desc": "피그마 디자인 툴을 활용하여 작업하였으며 여러 모바일 기기의 화면 크기와 해상도에 대응하기 위해 picture 태그와 source태그, srcset속성을 활용하여 이미지최적화를 하였습니다.",
"siteLink": "",
"descLink": "https://www.notion.so/Mobile-Site-7847cf91e1474787a3eb79d5d3ec398a"
}
],
"javasciprt": [
{
"id": 1,
"subTitle": "웹 표준 사이트",
"title": "Web Standard",
"backgroundURL": "/myworks01.jpg",
"desc": "웹 표준을 가장 준수하여 만든 사이트입니다. 웹 접근성을 위해 스킵메뉴작업, IR기법을 이용한 이미지 숨김처리, W3C 호환성 검사를 완료하였고, 이미지 스프라이트 기법을 이용하여 이미지 작업을 진행하였습니다. slick slider 라이�브러리를 이용하여 향상된 기능을 제공하는 이미지 슬라이드 작업을 하였습니다.",
"siteLink": "",
"descLink": "https://www.notion.so/Web-standard-39d3df460a42439f84a01e86f8e8b6e1"
}
]
}
🍽️ jQuery에서 next.js로 컴포넌트화, css적용하면서 문제를 겪은 부분
이미지가 나오지 않는 문제
myWorksSection에서 이미지는 img태그로 한 것이 아닌 css backgroundimage로 적용한 것입니다. 경로를 json에서 동적으로 끌고 와야한 상황이었고 css파일에서 일일히 적용해줄 수 없는 상황이었는데요. inline으로 스타일을 지정하고 이미지는 src/public이 아닌 제일 루트에 있는 public폴더에 넣어 이미지가 렌더 되게하였습니다.
🍽️ 결과물 보기
아직 진행중입니다. 다음 포스팅에선 css 개선을 해볼거에요.
https://nextjs-portfolio-migration.vercel.app/